Redux 활용 (state 값 변경, CRUD 실습) - 생활코딩 예제참고
2020, Oct 20
공식문서를 보고 바로 따라하면서 공부하려고 했으나 처음부터 입문하기에는 어려움이 있는 것 같아 비교적 간단해 보이는 예제인 생활코딩 예제부터 따라했다. 생활 코딩 예제의 경우에는 React 기준이 아닌 html에서 바로 시작하도록 되어있어서 비교적 진입장벽이 낮다. Redux 공식문서의 경우에는 React 기준으로 파일들이 나뉘어져 있어서 조금 더 이해하기에 복잡한 것 같다.
생활 코딩 예제 따라하기
- Youtube 채널에서 생활코딩으로 검색해서도 볼 수 있으므로 꼭 인프런을 가입해서 볼 필요는 없다.
https://www.inflearn.com/course/redux-생활코딩/lecture/34691?tab=note
redux CDN 추가
- React 였다면 import 하여서 시작했겠지만 html 파일에 간단하게 연습하는 것이므로 cdn을 추가하였다.
<script src="https://cdnjs.cloudflare.com/ajax/libs/redux/4.0.5/redux.min.js"></script>
생활 코딩 redux 예제1 작성
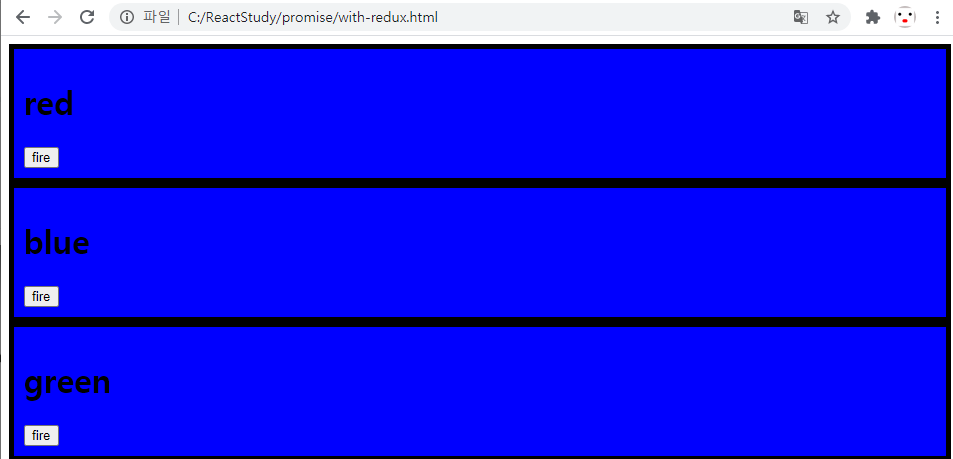
- fire 버튼을 클릭하면 해당 네모에 쓰여있는 색깔로 주변 네모들까지 배경색이 바꿔지는 애플리케이션이다.
with-redux.html
<!DOCTYPE html>
<html lang="en">
<head>
    <meta charset="UTF-8">
    <meta name="viewport" content="width=device-width, initial-scale=1.0">
    <title>Redux Test</title>
    <script src="https://cdnjs.cloudflare.com/ajax/libs/redux/4.0.5/redux.min.js"></script>
</head>
<body>
    <style>
        .container{
            border: 5px solid black;
            padding: 10px;
        }
    </style>
    <div id="red"></div>
    <div id="blue"></div>
    <div id="green"></div>
    <script>
        //reducer 함수
        function reducer(state, action){
            if(state === undefined){
                return {color:'yellow'}
            }

            var newState;
            if(action.type === 'CHANGE_COLOR'){
                newState = Object.assign({}, state, {color:action.color});
            }

            return newState;
        }
        //store 생성
        var store = Redux.createStore(reducer);

        function red(){
            //store에 있는 상태값 가져오기
            const state = store.getState();
            //view 그리기 (클릭할 때 store의 dispatch를 통해서 reducer로 state 값 변경)
            document.querySelector('#red').innerHTML=`
            <div class="container" id="component_red" style="background-color:${state.color}">
                <h1>red</h1>
                <input type="button" value="fire" onclick="
                store.dispatch({type: 'CHANGE_COLOR', color:'red'});">
            </div>
            `;
        }
        red();
        //렌더링으로 변경될 함수 등록
        store.subscribe(red);

        function blue(){
            //store에 있는 상태값 가져오기
            const state = store.getState();
            //view 그리기 (클릭할 때 store의 dispatch를 통해서 reducer로 state 값 변경)
            document.querySelector('#blue').innerHTML=`
            <div class="container" id="component_blue" style="background-color:${state.color}">
                <h1>blue</h1>
                <input type="button" value="fire" onclick="
                store.dispatch({type: 'CHANGE_COLOR', color:'blue'});">
            </div>
            `;
        }
        blue();
        //렌더링으로 변경될 함수 등록
        store.subscribe(blue);

        function green(){
            //store에 있는 상태값 가져오기
            const state = store.getState();
            //view 그리기 (클릭할 때 store의 dispatch를 통해서 reducer로 state 값 변경)
            document.querySelector('#green').innerHTML=`
            <div class="container" id="component_green" style="background-color:${state.color}">
                <h1>green</h1>
                <input type="button" value="fire" onclick="
                store.dispatch({type: 'CHANGE_COLOR', color:'green'});">
            </div>
            `;
        }
        green();
        //렌더링으로 변경될 함수 등록
        store.subscribe(green);
    </script>
</body>
</html>

Redux Dev Tools 활용
- 필자는 크롬 버전으로 설치하였다.
https://chrome.google.com/webstore/detail/redux-devtools/lmhkpmbekcpmknklioeibfkpmmfibljd
- 크롬이 아닌 타 브라우저를 사용하는 분들은 아래의 URL을 참고하기 바란다.
https://github.com/zalmoxisus/redux-devtools-extension
- 설치한 이후에 사용하고 싶다면 store를 생성한 쪽에 아래와 같이 + 뒤에 있는 소스를 넣어주도록 한다.
- 로컬에서 html 파일을 그대로 실행하여 브라우저에 띄웠을 때는 인식이 되지 않는 것 같으니 간단하게 VS code 플러그인 중
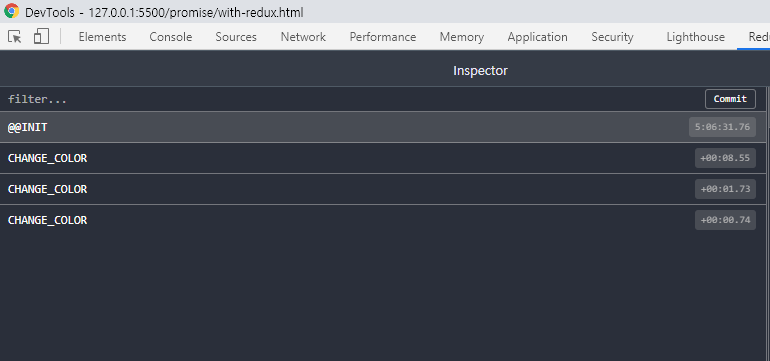
live server를 사용하여 서버를 띄워서 활용하기 바란다. - 상태값이 변경될 때마다 히스토리를 볼 수 있고 그 기록을 import나 export도 할 수 있는 것 같다.
//Redux Dev Tools를 사용하기 위한 세팅
const store = createStore(
   reducer, /* preloadedState, */
+  window.__REDUX_DEVTOOLS_EXTENSION__ && window.__REDUX_DEVTOOLS_EXTENSION__()
 );

//필자의 경우 위의 예제를 활용해서 이와같이 바꾸었다.
var store = Redux.createStore(reducer, window.__REDUX_DEVTOOLS_EXTENSION__ && window.__REDUX_DEVTOOLS_EXTENSION__());

Logging
console.log(action.type, action, state, newState); 와 같이 로그를 찍어주면 action의 type과 액션, 기존 상태값, 새로운 상태값을 볼 수 있다.
function reducer(state, action){
      if(state === undefined){
          return {color:'yellow'}
      }

      var newState;
      if(action.type === 'CHANGE_COLOR'){
          newState = Object.assign({}, state, {color:action.color});
      }
      console.log(action.type, action, state, newState);
      return newState;
  }

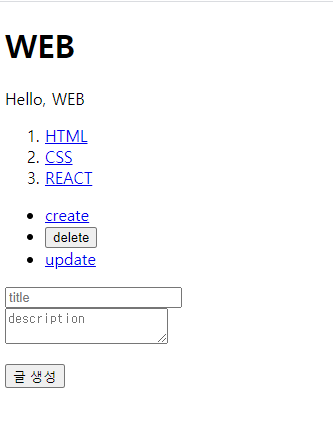
생활 코딩 redux 예제2 - Create, Delete, Read 적용
<!DOCTYPE html>
<html lang="en">
<head>
    <meta charset="UTF-8">
    <meta name="viewport" content="width=device-width, initial-scale=1.0">
    <script src="https://cdnjs.cloudflare.com/ajax/libs/redux/4.0.5/redux.min.js"></script>
</head>
<body>
    <div id="subject"></div>
    <div id="TOC"></div>
    <div id="control"></div>
    <div id="article"></div>
    <script>
        //header 영역
        function subject(){
            document.querySelector('#subject').innerHTML = `
            <header>
                <h1>WEB</h1>
                Hello, WEB
            </header>
            `;
        }
        //TOC 영역
        function TOC(){
            //store 값 가져오기
            const state = store.getState();
            let i = 0;
            let liTags = '';
            //반복문을 통해 contents 갯수만큼 li 태그 생성
            while(i<state.contents.length){
                // a태그 클릭시 SELECT action 호출 (id값 하나만 넘겨주면 됨)
                liTags += `
                    <li>
                        <a onclick="event.preventDefault();
                        const action = {type:'SELECT', id:${state.contents[i].id}}
                        store.dispatch(action)"
                            href="${state.contents[i].id}">
                            ${state.contents[i].title}
                        </a>
                    </li>
                `;
                i= i+1;
            }
            document.querySelector('#TOC').innerHTML = `
            <nav>
                <ol>
                    ${liTags}
                </ol>
            </nav>
            `;
        }
        //control 영역
        function control(){
            //create, delete, update 버튼 및 a태그 그리기
            //create와 update는 하단에 입력 form 노출하도록 CHANGE_MODE action type, mode 각각 세팅
            //delete는 DELETE action type 세팅
            document.querySelector('#control').innerHTML=`
            <ul>
                <li><a onclick="event.preventDefault();
                    store.dispatch({type:'CHANGE_MODE',
                    mode:'create'
                })
                    " href="/create">create</a></li>
                <li><input type="button" onclick="
                    store.dispatch({
                        type : 'DELETE'
                    })" value="delete"></li>
                <li><a onclick="event.preventDefault();
                store.dispatch({type:'CHANGE_MODE',
                mode:'update'
                })
                " href="/update">update</a></li>
            </ul>
            `;
        }
        //article 영역
        function article(){
            //store 객체 가져오기
            const state = store.getState();
            //create mode일 경우
            if(state.mode === 'create'){
                //하단에 입력 폼 생성 submit 버튼을 통해 CREATE type action 호출
                document.querySelector('#article').innerHTML=`
                <article>
                    <form onsubmit="event.preventDefault();
                        const _title = this.title.value;
                        const _desc = this.desc.value;
                        store.dispatch({
                            type: 'CREATE',
                            title: _title,
                            desc: _desc
                        })
                    ">
                        <p>
                            <input type="text" name="title"
                            placeholder="title"><br>
                            <textarea name="desc"
                            placeholder="description"></textarea>
                        </p>
                        <p>
                            <input type="submit" value="글 생성"></input>
                        </p>
                    </form>
                </article>
                `;
            //read mode 일 경우
            }else if(state.mode === 'read'){
                //반복문 돌면서 클릭한 컨텐츠의 제목과 내용을 보여주도록 함.
                let i = 0;
                let aTitle, aDesc
                while(i < state.contents.length){
                    if(state.contents[i].id === state.selected_id){
                        aTitle = state.contents[i].title;
                        aDesc = state.contents[i].desc;
                        break;
                    }
                    i=i+1;
                }
                document.querySelector('#article').innerHTML=`
                <article>
                    <h2>${aTitle}</h2>
                        ${aDesc}
                </article>
                `;
            //welcome mode일 경우 article 영역에 welcome 출력
            }else if(state.mode === 'welcome'){
                document.querySelector('#article').innerHTML=`
                <article>
                    <h2>Welcome</h2>
                    Hello Redux!!
                </article>
                `;
            //update mode일 경우
            }if(state.mode === 'update'){
                //하단에 수정폼 출력
                //onsubmit을 통해 UPDATE type action 호출
                document.querySelector('#article').innerHTML=`
                <article>
                    <form onsubmit="event.preventDefault();
                        const _title = this.title.value;
                        const _desc = this.desc.value;
                        store.dispatch({
                            type: 'UPDATE',
                            title: _title,
                            desc: _desc
                        })
                    ">
                        <p>
                            <input type="text" name="title"
                            placeholder="title"><br>
                            <textarea name="desc"
                            placeholder="description"></textarea>
                        </p>
                        <p>
                            <input type="submit" value="글 수정"></input>
                        </p>
                    </form>
                </article>
                `;
            }
        }

        //reducer
        function reducer(state, action){

            //초기 state가 undefined일 경우
            if(state === undefined){
                return {
                    max_id:3,
                    mode:"create",
                    selected_id:1,
                    contents : [
                        {id:1, title:'HTML',desc:'HTML is ..'},
                        {id:2, title:'CSS',desc:'CSS is ..'},
                        {id:3, title:'REACT',desc:'REACT is ..'},
                    ]
                }
            }
            var newState;
            //조회
            if(action.type === 'SELECT'){
                newState = Object.assign({}, state,
                {selected_id:action.id,
                    mode: 'read'
                });
            //추가
            }else if(action.type === 'CREATE'){
                const newMaxId = state.max_id + 1;
                const newContents = state.contents.concat();
                newContents.push({id: newMaxId, title: action.title, desc: action.desc})
                newState = Object.assign({}, state, {
                    max_id:newMaxId,
                    contents: newContents,
                    mode:'read'
                })
            //삭제
            }else if(action.type === 'DELETE'){
                const newContents = [];
                let i = 0;
                while (i<state.contents.length){
                    console.log('content[i]'+state.contents[i].id);
                    if(state.selected_id !== state.contents[i].id){
                        newContents.push(
                            state.contents[i]
                        );
                    }
                    i = i+1;
                }

                newState = Object.assign({},state,{
                    contents:newContents,
                    mode:'welcome'
                })
            //모드 변경 (추가, 수정폼 노출용)
            }else if(action.type === 'CHANGE_MODE'){
                newState = Object.assign({},state,{
                    mode:action.mode
                })
            //수정
            }else if(action.type === 'UPDATE'){
                const newContents = [];
                let i = 0;
                while (i<state.contents.length){
                    if(state.selected_id !== state.contents[i].id){
                        newContents.push(
                            state.contents[i]
                        );
                    }else{
                        newContents.push({
                            id:state.selected_id,
                            title: action.title,
                            contents: action.contents,
                            desc: action.desc,
                        });
                    }
                    i = i+1;

                    newState = Object.assign({},state,{
                        contents:newContents,
                        mode:'welcome'
                    })
                }
            }
            console.log(state, action, newState);
            return newState;
        }

        //store 생성
        const store = Redux.createStore(reducer);
        //상태값에 따라 렌더링 해줄 함수 추가
        store.subscribe(article);
        store.subscribe(TOC);
        //초기에 화면 그리기
        subject();
        TOC();
        control();
        article();

    </script>


</body>
</html>

여기까지 공부하고 나니 Redux에 대한 이해가 어느정도 되어서 다시 공식문서를 보았더니 공식문서가 복잡한 것이 아니라 Redux 템플릿을 적용해서 구조가 달랐고 사용 방법에 따라 예제도 다르다는 것을 알 수 있었다. 역시 처음에는 항상 헤매는 나이다 보니 이번에도 기초적인 것을 공부하고 나서야 깨닫는 하루였다.